I mentioned in my last post that I was working on a two piece commission. Initially the people commissioning had asked for a large piece- larger than what I normally work or can manage on my littlest Bernina workhorse which has a small throat. So we agreed that I make two pieces which are still on the large side of the size I normally work but still manageable. So the pieces were to measure 150 cm x 100 cm.
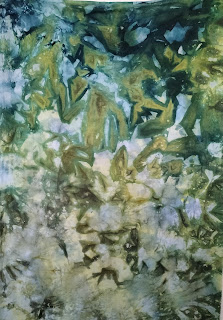
The commissioners also had suggested some colours in the dyed background cloth. It took quite a few attempts to get cloth that I thought would work which I then sent to the people to choose.
Above are some of the fabrics I dyed- there were more but I had to be mindful that they needed to go together as a set, plus I needed to be able to print on them as the commissioners had indicated they liked the monoprinted pieces I had done with foliage from my morning walks. This method of dyeing gives great results but it is not easy to control where dark and light appears nor how the colours will bleed into each other. The minute you put blue and yellow together you end up with greens and things can become green too quickly - but it also needed dark colour in there for contrast.
Once the background fabrics had been selected I started the printing with foliage that i collected on morning walks,
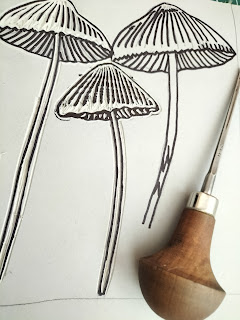
The photo above is of the printing on the dyed pieces of fabric- once stitching goes in then things can be accentuated a bit more. Once I had the first piece basted the people commissioning had an additional request as they were fungi enthusiasts, they asked if fungi could be included in the printing process. By this stage I had already started stitching in the foliage details so the piece was already batted up and had been partially stitched. This took a bit of procrastinatng as to how I might do it and also as the fungi blocks I had made last year were very blocky and I was loathe to cut them to shape as they are a set with which I intend to do something booky at some point in time. So the only solution was to make some new linocuts that I could somehow manoeuvre into the unstitched spaces.
Phew! It worked, as I was petrified I would spill some printing ink or get a dodgy print which would ruin the whole piece as by this stage I had already done a fair bit of stitching. You can to some extent fix misprints with stitching but this was quite daunting as it was quite a large piece which already had quite a lot of stitching in place. The end result enthused me sufficiently to make another toadstool linocut after encountering one on a recent morning walk.
It was too difficult to include this little toadstool in the first piece I had already started stitching but I was able to print it onto the second piece I had to make. These pieces have been very densely stitched- I call it free machine drawing because essentially I am creating drawings with my machine- and these pieces are large drawings- really large drawings all done on a little domestic Bernina 325 which is the smallest machine in the Bernina range. I dream of a large machine but I am thinking that is what it will remain a dream. But meanwhile whilst it is not easy manoeuvring such a large piece under a small machine it is possible and I have been doing it for a very long time/. Some of the stitching progress...
In this stitching process threads are like my pencil- I use them for line and to create interest in the background and for detailing. I would have to say that thread is of number one importance in the work I create and I have been fortunate to have Aurifil sponsor some of my thread in the past . I use 28 weight cotton Mako thread which is not easily available in Australia but is wonderful to work with and gives such great line and accent.
So the last few weeks have been a marathon of stitching. Then the squaring up which I did out at Arc Yinnar as they had a table big enough . Normally i do this on the floor but because these two pieces will hang together they need to be as much the exact same size as is possible when dealing with textile. I also decided to do faced bindings as I did not really want anything to distract from the flow of the stitching.
And so finally after about 3 months from first contact these pieces have been finished and sent to their new owners. They liked the photos I sent but it is simply not the same as seeing the pieces in the flesh. And so here are the finished pieces, not photographed terribly well I am afraid- there was too much light coming from the left.
In the end I was actually quite pleased with how they looked- there is always that anxiety of whether the people who have commissioned the piece will like what you have done, the anxiety of whether it really works. Whilst I have made forest quilts before, these are a little different because there is more blue in them than I would normally do in the background dyeing and also the printing I do has subtly changed since last year when I started incorporating foliage from my morning walks into my work. The addition of the linocuts was an additional challenge and something I had not done before but I liked how they looked in these pieces.


5 comments:
Wonderful and thank you for sharing the process and the journey.
Just gorgeous
These are fabulous! The toadstools look as though they were planned in from the very beginning! So well integrated. Thank you for sharing this and all of the work you do.
Wow...awesome!!!!! Not surprised you'd do a great job...thanks for sharing!
I love the work and how you share the process. So informative.
Post a Comment